I previously wrote about Choria Playbooks – a reminder they are playbooks written in YAML format and can orchestrate many different kinds of tasks, data, inputs and discovery systems – not exclusively ones from MCollective. It integrates with tools like terraform, consul, etcd, Slack, Graphite, Webhooks, Shell scripts, Puppet PQL and of course MCollective.
I mentioned in that blog post that I did not think a YAML based playbook is the way to go.
I am very pleased to announce that with the release of Choria 0.6.0 playbooks can now be written with the Puppet DSL. I am so pleased with this that effectively immediately the YAML DSL is deprecated and set for a rather short life time.
A basic example can be seen here, it will:
Reuse a company specific playbook and notify Slack of the action about to be taken
Discover nodes using PQL in a specified cluster and verify they are using a compatible Puppet Agent
Obtain a lock in Consul ensuring only 1 member in the team perform critical tasks related to the life cycle of the Puppet Agent at a time
Disable Puppet on the discovered nodes
Wait for up to 200 seconds for the nodes to become idle
As you can see we can re-use playbooks and build up a nice cache of utilities that the entire team can use, the support for locks and data sharing ensures safe and coordinated use of this style of system.
The Plan DSL as you’ll see in the Background and History part later in this post is something I have wanted a long time. I think the current generation Puppet DSL is fantastic and really suited to this problem. Of course having this in the Plan DSL I can now also create Ruby versions of this and I might well do that.
The Plan DSL though have many advantages:
Many of us already know the DSL
There are vast amounts of documentation and examples of Puppet code, you can get trained to use it.
The other tools in the Puppet stable support plans – you can use puppet strings to document your Playbooks
The community around the Puppet DSL is very strong, I imagine soon rspec-puppet might support testing Plans and so by extension Playbooks. This appears to be already possible but not quite as easy as it could be.
We have a capable and widely used way of sharing these between us in the Puppet Forge
I could not compete with this in any language I might want to support.
Future of Choria Playbooks
As I mentioned the YAML playbooks are not long for this world. I think they were an awesome experiment and I learned a ton from them, but these Plan based Playbooks are such a massive step forward that I just can’t see the YAML ones serving any purpose what so ever.
This release supports both YAML and Plan based Playbooks, the next release will ditch the YAML ones.
At that time a LOT of code will be removed from the repositories and I will be able to very significantly simplify the supporting code. My goal is to make it possible to add new task types, data sources, discovery sources etc really easily, perhaps even via Puppet modules so the eco system around these will grow.
I will be doing a bunch of work on the Choria Plugins (agent, server, puppet etc) and these might start shipping small Playbooks that you can use in your own Playbooks. The one that started this blog post would be a great candidate to supply as part of the Choria suite and I’d like to do that for this and many other plugins.
Background and History
For many years I have wanted Puppet to move in a direction that might one day support scripts – perhaps even become a good candidate for shell scripts, not at the expense of the CM DSL but as a way to reward people for knowing the Puppet Language. I wanted this for many reasons but a major one was because I wanted to use it as a DSL to write orchestration scripts for MCollective.
I did some proof of concepts of this late in 2012, you can see the fruits of this POC here, it allowed one to orchestrate MCollective tasks using Puppet DSL and a Ruby DSL. This was interesting but the DSL as it was then was no good for this.
I also made a pure YAML Puppet DSL that deeply incorporated Hiera and remained compatible with the Puppet DSL. This too was interesting and in hindsight given the popularity of YAML I think I should have given this a lot more attention than I did.
Neither of these really worked for what I needed. Around the time Henrik Lindberg started talking about massive changes to the Puppet DSL and I think our first ever conversation covered this very topic – this must have been back in 2012 as well.
More recently I worked on YAML based playbooks for Choria, a sample can be seen in the old Choria docs, this is about the closest I got to something workable, we have users in the wild using it and having success with these. As a exploration they were super handy and taught me loads.
Fast forward to Puppet Conf 2017 and Puppet Inc announced something called Puppet Plans, these are basically script like, uncompiled (kind of), top-down executed and aimed at use within your CLI much like you would a script. This was fantastic news, unfortunately the reality ended up with these locked up inside their new SSH based orchestrator called Bolt. Due to some very unfortunate technical direction and decision making Plans are entirely unusable by Puppet users without Bolt. Bolt vendors it’s own Puppet and Facter and so it’s unaware of the AIO Puppet.
Ideally I would want to use Plans as maintained by Puppet Inc for my Playbooks but the current status of things are that the team just is not interested in moving in that direction. Thus in the latest version of Choria I have implemented my own runner, result types, error types and everything needed to write Choria Playbooks using the Puppet DSL.
Conclusion
I am really pleased with how these playbooks turned out and am excited for what I can provide to the community in the future. There are no doubt some rough edges today in the implementation and documentation, your continued feedback and engagement in the Choria community around these would ensure that in time we will have THE Playbook system in the Puppet Eco system.
In my previous post I talked about the need to load test Choria given that I now aim for much larger workloads. This post goes into a few of the things you need to consider when sizing the optimal network size.
Given that we now have the flexibility to build 50 000 node networks quite easily with Choria the question is should we, and if yes then what is the right size. As we can now federate multiple Collectives together into one where each member Collective is a standalone network we have the opportunity to optimise for the operability of the network rather than be forced to just build it as big as we can.
What do I mean when I say the operability of the network? Quite a lot of things:
What is your target response time on a unbatched mco rpc rpcutil ping command
What is your target discovery time? You should use a discovery data source but broadcast is useful, so how long do you want?
If you are using a discovery source, how long do you want to wait for publishes to happen?
How many agents will you run? Each agent makes multiple subscriptions on the middleware and consume resources there
How many sub collectives do you want? Each sub collective multiply the amount of subscriptions
How many federated networks will you run?
When you restart the entire NATS, how long do you want to wait for the whole network to reconnect?
How many NATS do you need? 1 can run 50 000 nodes, but you might want a cluster for HA. Clustering introduces overhead in the middleware
If you are federating a global distributed network, what impact does the latency cross the federation have and what is acceptable
So you can see that to a large extend the answer here is related to your needs and not only to the needs of benchmarking Choria. I am working on a set of tools to allow anyone to run tests locally or on a EC2 network. The main work hose is a Choria emulator that runs a 1 000 or more Choria instances on a single node so you can use a 50 node EC2 network to simulate a 50 000 node one.
Middleware Scaling Concerns
Generally for middleware brokers there are a few things that impact their scalability:
Number of TCP Connections – generally a thread/process is made for each
TLS or Plain text – huge overhead in TLS typically and it can put a lot of strain on single systems
Number of message targets – queues, topics, etc. Different types of target have different overheads. Often a thread/process for each.
Number of subscribers to each target
Cluster overhead
Persistence overheads like storage and ACKs etc
You can see it’s quite a large number of variables that goes into this, anywhere that requires a thread or process to manage 1 of it means you should get worried or at least be in a position to measure it.
NATS uses 1 go routine for each connection and no additional ones per subscription etc, its quite light weight but there are no hard and fast rules. Best to observe how it grows by needs, something I’ll include in my test suite.
How Choria uses NATS
It helps then to understand how Choria will use NATS and what connections and targets it makes.
A single Choria node will:
Maintain a single TCP+TLS connection to NATS
Subscribe to 1 queue unique to the node for every Subcollective it belongs to
For every agent – puppet, package, service, etc – subscribe to a broadcast topic for that agent. Once in every Subcollective. Choria comes default with 7 agents.
So if you have a node with 10 agents in 5 Subcollectives:
50 broadcast subjects for agents
5 queue subjects
1 TCP+TLS connection
So 100 nodes will have 5 500 subscriptions, 550 NATS subjects and 100 TCP+TLS connections.
Ruby based Federation brokers will maintain 1 subscription to a queue subject on the Federation and same on the Collective. The upcoming Go based Federation Brokers will maintain 10 (configurable) connections to NATS on each side, each with these subscriptions.
Conclusion
This will give us a good input into designing a suite of tools to measure various things during the run time of a big test, check back later for details about such a tool.
You can read about the emulator I wrote in the next post.
Many of you probably know I am working on a project called Choria that modernize MCollective which will eventually supersede MCollective (more on this later).
Given that Choria is heading down a path of being a rewrite in Go I am also taking the opportunity to look into much larger scale problems to meet some client needs.
In this and the following posts I’ll write about work I am doing to load test and validate Choria to 100s of thousands of nodes and what tooling I created to do that.
Middleware
Choria builds around the NATS middleware which is a Go based middleware server that forgoes a lot of the persistence and other expensive features – instead it focusses on being a fire and forget middleware network. It has an additional project should you need those features so you can mix and match quite easily.
Turns out that’s exactly what typical MCollective needs as it never really used the persistence features and those just made the associated middleware quite heavy.
To give you an idea, in the old days the community would suggest every ~ 1000 nodes managed by MCollective required a single ActiveMQ instance. Want 5 500 MCollective nodes? That’ll be 6 machines – physical recommended – and 24 to 30 GB RAM in a cluster just to run the middleware. We’ve had reports of much larger RabbitMQ networks on 4 or 5 servers – 50 000 managed nodes or more, but those would be big machines and they had quite a lot of performance issues.
There was a time where 5 500 nodes was A LOT but now it’s becoming a bit every day, so I need to focus upward.
With NATS+Choria I am happily running 5 500 nodes on a single 2 CPU VM with 4GB RAM. In fact on a slightly bigger VM I am happily running 50 000 nodes on a single VM and NATS uses around 1GB to 1.5GB of RAM at peak.
Doing 100s of RPC requests in a row against 50 000 nodes the response time is pretty solid around 16 seconds for a RPC call to every node, it’s stable, never drops a message and the performance stays level in the absence of Java GC issues. This is fast but also quite slow – the Ruby client manages about 300 replies every 0.10 seconds due to the amount of protocol decoding etc that is needed.
This brings with it a whole new level of problem. Just how far can we take the client code and how do you determine when it’s too big and how do I know the client, broker and federation I am working on significantly improve things.
I’ve also significantly reworked the network protocol to support Federation but the shipped code optimize for code and config simplicity over lets say support for 20 000 Federation Collectives. When we are talking about truly gigantic Choria networks I need to be able to test scenarios involving 10s of thousands of Federated Network all with 10s of thousands of nodes in them. So I need tooling that lets me do this.
Getting to running 50 000 nodes
Not everyone just happen to have a 50 000 node network lying about they can play with so I had to improvise a bit.
As part of the rewrite I am doing I am building a Go framework with the Choria protocol, config parsing and network handling all built in Go. Unlike the Ruby code I can instantiate multiple of these in memory and run them in Go routines.
This means I could write a emulator that can start a number of faked Choria daemons all in one process. They each have their own middleware connection, run a varying amount of agents with a varying amount of sub collectives and generally behave like a normal MCollective machine. On my MacBook I can run 1 500 Choria instances quite easily.
So with fewer than 60 machines I can emulate 50 000 MCollective nodes on a 3 node NATS cluster and have plenty of spare capacity. This is well within budget to run on AWS and not uncommon these days to have that many dev machines around.
In the following posts I’ll cover bits about the emulator, what I look for when determining optimal network sizes and how to use the emulator to test and validate performance of different network topologies.
Recently I was given the opportunity by the NATS.io folk to talk about Choria and NATS on one of their community events. The recording of the talk as well as the slide deck can be found below.
The old MCollective protocols are now ancient and was quite Ruby slanted – full of Symbols and used YAML and quite language specific – in Choria I’d like to support other Programming Languages, REST gateways and so forth, so a rethink was needed.
I’ll look at the basic transport protocol used by the Choria NATS connector, usually it’s quite unusual to speak of Network Protocols when dealing with messages on a broker but really for MCollective it is exactly that – a Network Protocol.
The messages need enough information for strong AAA, they need to have an agreed on security structure and within them live things like RPC requests. So a formal specification is needed which is exactly what a Protocol is.
While creating Choria the entire protocol stack has been redesigned on every level except the core MCollective messages – Choria maintains a small compatibility layer to make things work. To really achieve my goal I’d need to downgrade MCollective to pure JSON data at which point multi language interop should be possible and easy.
Networks are Onions
Network protocols tend to come in layers, one protocol within another within another. The nearer you go to the transport the more generic it gets. This is true for HTTP within TCP within IP within Ethernet and likewise it’s true for MCollective.
Just like for TCP/IP and HTTP+FTP one MCollective network can carry many protocols like the RPC one, a typical MCollective install uses 2 protocols at this inner most layer. You can even make your own, the entire RPC system is a plugin!
( middleware protocol
  ( transport packet that travels over the middleware
      ( security plugin internal representation
        ( mcollective core representation that becomes M::Message
          ( MCollective Core Message )
          ( RPC Request, RPC Reply )
          ( Other Protocols, .... )
        )
      )
    )
  )
)
( middleware protocol
( transport packet that travels over the middleware
( security plugin internal representation
( mcollective core representation that becomes M::Message
( MCollective Core Message )
( RPC Request, RPC Reply )
( Other Protocols, .... )
)
)
)
)
)
Here you can see when you do mco rpc puppet status you’ll be creating a RPC Request wrapped in a MCollective Message, wrapped in a structure the Security Plugin dictates, wrapped in a structure the Connector Plugin dictates and from there to your middleware like NATS.
Today I’ll look at the Transport Packet since that is where Network Federation lives which I spoke about yesterday.
Transport Layer
The Transport Layer packets are unauthenticated and unsigned, for MCollective security happens in the packet carried within the transport so this is fine. It’s not inconceivable that a Federation might only want to route signed messages and it’s quite easy to add later if needed.
Of course the NATS daemons will only accept TLS connections from certificates signed by the CA so these network packets are encrypted and access to the transport medium is restricted, but the JSON data you’ll see below is sent as is.
In all the messages shown below you’ll see a seen-by header, this is a feature of the NATS Connector Plugin that records the connected NATS broker, we’ll soon expose this information to MCollective API clients so we can make a traceroute tool for Federations. This header is optional and off by default though.
I’ll show messages in Ruby format here but it’s all JSON on the wire.
Message Targets
First it’s worth knowing where things are sent on the NATS clusters. The targets used by the NATS connector is pretty simple stuff, there will no doubt be scope for improvement once I look to support NATS Streaming but for now this is adequate.
Broadcast Request for agent puppet in the mycorp sub collective – mycorp.broadcast.agent.puppet
Directed Request to a node for any agent in the mycorp sub collective – mycorp.node.node1.example.net
Reply to a node identity dev1.example.net with pid 9999 and a message sequence of 10 – mycorp.reply.node1.example.net.9999.10
As the Federation Brokers are independent of Sub Collectives they are not prefixed with any collective specific token:
Requests from a Federation Client to a Federation Broker Cluster called production – choria.federation.production.federation queue group production_federation
Replies from the Collective to a Federation Broker Cluster called production – choria.federation.production.collective queue group production_collective
production cluster Federation Broker Instances publishes statistics – choria.federation.production.stats
These names are designed so that in smaller setups or in development you could use a single NATS cluster with Federation Brokers between standalone collectives. Not really a recommended thing but it helps in development.
Unfederated Messages
Your basic Unfederated Message is pretty simple:
{"data"=>"... any text ...",
"headers"=>{"mc_sender"=>"dev1.example.net",
"seen-by"=>["dev1.example.net", "nats1.example.net"],
"reply-to"=>"mcollective.reply.dev1.example.net.999999.0",
}}
it’s is a discovery request within the sub collective mcollective and would be published to mcollective.broadcast.agent.discovery.
it is sent from a machine identifying as dev1.example.net
we know it’s traveled via a NATS broker called nats1.example.net.
responses to this message needs to travel via NATS using the target mcollective.reply.dev1.example.net.999999.0.
The data is completely unstructured as far as this message is concerned it just needs to be some text, so base64 encoded is common. All the transport care for is getting this data to its destination with metadata attached, it does not care what’s in the data.
The reply to this message is almost identical:
{"data"=>"... any text ...",
"headers"=>{"mc_sender"=>"dev2.example.net",
"seen-by"=>["dev1.example.net", "nats1.example.net", "dev2.example.net", "nats2.example.net"],
}}
This reply will travel via mcollective.reply.dev1.example.net.999999.0, we know that the node dev2.example.net is connected to nats2.example.net.
We can create a full traceroute like output with this which would show dev1.example.net -> nats1.example.net -> nats2.example.net -> dev2.example.net
Federated Messages
Federation is possible because MCollective will just store whatever Headers are in the message and put them back on the way out in any new replies. Given this we can embed all the federation metadata and this metadata travels along with each individual message – so the Federation Brokers can be entirely stateless, all the needed state lives with the messages.
With Federation Brokers being clusters this means your message request might flow over a cluster member a but the reply can come via b – and if it’s a stream of replies they will be load balanced by the members. The Federation Broker Instances do not need something like Consul or shared store since all the data needed is in the messages.
Lets look at the same Request as earlier if the client was configured to belong to a Federation with a network called production as one of its members. It’s identical to before except the federation structure was added:
{"data"=>"... any text ...",
"headers"=>{"mc_sender"=>"dev1.example.net",
"seen-by"=>["dev1.example.net", "nats1.fed.example.net"],
"reply-to"=>"mcollective.reply.dev1.example.net.999999.0",
"federation"=>{"req"=>"68b329da9893e34099c7d8ad5cb9c940",
"target"=>["mcollective.broadcast.agent.discovery"]}}}
it’s is a discovery request within the sub collective mcollective and would be published via a Federation Broker Cluster called production via NATS choria.federation.production.federation.
it is sent from a machine identifying as dev1.example.net
it’s traveled via a NATS broker called nats1.fed.example.net.
responses to this message needs to travel via NATS using the target mcollective.reply.dev1.example.net.999999.0.
it’s federated and the client wants the Federation Broker to deliver it to it’s connected Member Collective on mcollective.broadcast.agent.discovery
The Federation Broker receives this and creates a new message that it publishes on it’s Member Collective:
{"data"=>"... any text ...",
"headers"=>{"mc_sender"=>"dev1.example.net",
"seen-by"=>["dev1.example.net",
"nats1.fed.example.net",
"nats2.fed.example.net",
"fedbroker_production_a",
"nats1.prod.example.net"],
"reply-to"=>"choria.federation.production.collective",
"federation"=>{"req"=>"68b329da9893e34099c7d8ad5cb9c940",
"reply-to"=>"mcollective.reply.dev1.example.net.999999.0"}}}
This is the same message as above, the Federation Broker recorded itself and it’s connected NATS server and produced a message, but in this message it intercepts the replies and tell the nodes to send them to choria.federation.production.collective and it records the original reply destination in the federation header.
A node that replies produce a reply, again this is very similar to the earlier reply except the federation header is coming back exactly as it was sent:
{"data"=>"... any text ...",
"headers"=>{"mc_sender"=>"dev2.example.net",
"seen-by"=>["dev1.example.net",
"nats1.fed.example.net",
"nats2.fed.example.net",
"fedbroker_production_a",
"nats1.prod.example.net",
"dev2.example.net",
"nats2.prod.example.net"],
"federation"=>{"req"=>"68b329da9893e34099c7d8ad5cb9c940",
"reply-to"=>"mcollective.reply.dev1.example.net.999999.0"}}}
We know this node was connected to nats1.prod.example.net and you can see the Federation Broker would know how to publish this to the client – the reply-to is exactly what the Client initially requested, so it creates:
{"data"=>"... any text ...",
"headers"=>{"mc_sender"=>"dev2.example.net",
"seen-by"=>["dev1.example.net",
"nats1.fed.example.net",
"nats2.fed.example.net",
"fedbroker_production_a",
"nats1.prod.example.net",
"dev2.example.net",
"nats2.prod.example.net",
"nats3.prod.example.net",
"fedbroker_production_b",
"nats3.fed.example.net"],
}}
Which gets published to mcollective.reply.dev1.example.net.999999.0.
Route Records
You noticed above there’s a seen-by header, this is something entirely new and never before done in MCollective – and entirely optional and off by default. I anticipate you’d want to run with this off most of the time once your setup is done, it’s a debugging aid.
As NATS is a full mesh your message probably only goes one hop within the Mesh. So if you record the connected server you publish into and the connected server your message entered it’s destination from you have a full route recorded.
The Federation Broker logs and MCollective Client and Server logs all include the message ID so you can do a full trace in message packets and logs.
There’s a PR against MCollective to expose this header to the client code so I will add something like mco federation trace some.node.example.net which would send a round trip to that node and tell you exactly how the packet travelled. This should help a lot in debugging your setups as they will now become quite complex.
The structure here is kind of meh and I will probably improve on it once the PR in MCollective lands and I can see what is the minimum needed to do a full trace.
By default I’ll probably record the identities of the MCollective bits when Federated and not at all when not Federated. But if you enable the setting to record the full route it will produce a record of MCollective bits and the NATS nodes involved.
In the end though from the Federation example we can infer a network like this:
We don’t know the details of all the individual NATS nodes that makes up the entire NATS mesh but this is good enough.
Of course this sample is the pathological case where nothing is connected to the same NATS instances anywhere. In my tests with a setup like this the overhead added across 10 000 round trips against 3 nodes – so 30 000 replies through 2 x Federation Brokers – was only 2 seconds, I couldn’t reliably measure a per message overhead as it was just too small.
The NATS gem do expose the details of the full mesh though since NATS will announce it’s cluster members to clients, I might do something with that not sure. Either way, auto generated network maps should be totally possible.
Conclusion
So this is how Network Federation works in Choria. It’s particularly nice that I was able to do this without needing any state on the cluster thanks to past self making good design decisions in MCollective.
Once the seen-by thing is figured out I’ll publish JSON Schemas for these messages and declare protocol versions.
I can probably make future posts about the other message formats but they’re a bit nasty as MCollective itself is not yet JSON safe, the plan is it would become JSON safe one day and the whole thing will become a lot more elegant. If someone pings me for this I’ll post it otherwise I’ll probably stop here.
Running large or distributed MCollective networks have always been a pain. As much as Middleware is an enabler it starts actively working against you as you grow and as latency increases, this is felt especially when you have geographically distributed networks.
Federation has been discussed often in the past but nothing ever happened, NATS ended up forcing my hand because it only supports a full mesh mode. Something that would not be suitable for a globe spanning network.
Overview
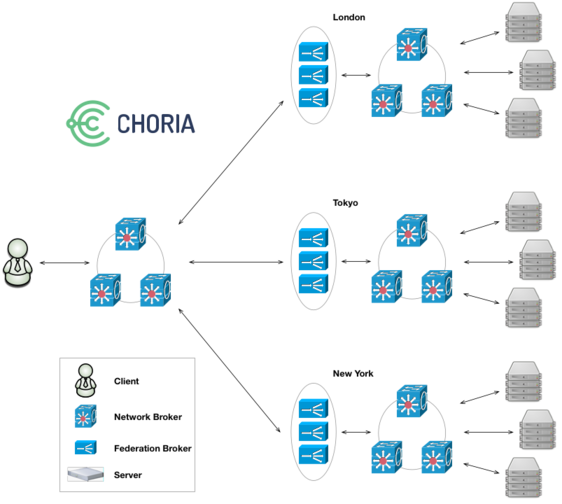
I spent the last week or two building in Federation first into the Choria network protocol and later added a Federation Broker. Federation can be used to connect entirely separate collectives together into one from the perspective of a client.
Here we can see a distributed Federation of Collectives. Effectively London, Tokyo and New York are entirely standalone collectives. They are smaller, they have their own middleware infrastructure, they even function just like a normal collective and can have clients communicating with those isolated collectives like always.
I set up 5 node NATS meshes in every region. We then add a Federation Broker cluster that provide bridging services to a central Federation network. I’d suggest running the Federation Broker Cluster one instance on each of your NATS nodes, but you can run as many as you like.
Correctly configured Clients that connect to the central Federation network will interact with all the isolated collectives as if they are one. All current MCollective features keep working and Sub Collectives can span the entire Federation.
Impact
There are obvious advantages in large networks – instead of one giant 100 000 node middleware you now need to built 10 x 10 000 node networks, something that is a lot easier to do. With NATS, it’s more or less trivial.
Not so obvious is how this scales wrt MCollective. MCollective has a mode called Direct Addressing where the client would need to create 1 message for every node targeted in the request. Generally very large requests are discouraged so it works ok.
These requests being made on the client ends up having to travel individually all across the globe and this is where it starts to hurt.
With Federation the client will divide the task of producing these per client messages into groups of 200 and pass the request to the Federation Broker Cluster. The cluster will then, in a load shared fashion, do the work for the client.
Since the Federation Broker tends to be near the individual Collectives this yields a massive reduction in client work and network traffic. The Federation Broker Instances are entirely state free so you can run as many as you like and they will share the workload more or less evenly across them.
Above you can see the client offloading the work onto a Federation Broker with 2 cluster members. The client sent 1024 messages but the broker sent 12288 messages on the clients behalf. The 2 instances does a reasonable job of sharing the load of creating and federating the messages across them.
In my tests against large collectives this speeds up the request significantly and greatly reduce the client load.
In the simple broadcast case there is no speed up, but when doing 10 000 requests in a loop the overhead of Federation was about 2 seconds over the 10 000 requests – so hardly noticeable.
Future Direction
The Choria protocol supports Federation in a way that is not tied to its specific Federation Broker implementation. The basic POC Federation Broker was around 200 lines so not really a great challenge to write.
I imagine in time we might see a few options here:
You can use different CAs in various places in your Federated network. The Federation Broker using Choria Security privileged certificates can provide user id mapping and rewriting between the Collectives
If you want to build a SaaS management services ontop of Choria a Federated network makes a really safe way to reach into managed networks without exposing the collectives to each other in any way. A client in one member Collective cannot use the Federation Brokers to access another Collective.
Custom RBAC and Auditing schemes can be built at the Federation Broker layer where the requests can be introspected and only ones matching policy are passed to the managed Collective
Federation is tailor made to provide Protocol translation. Different protocol Collectives can be bridged together. An older MCollective SSL based collective can be reached from a Choria collective via a Federation Broker providing translation capabilities. Ditto a Websocket interface to Collectives can be a Federation Broker listening on Websocket while speaking NATS on the other end.
The security implications are huge, isolated collectives with isolated CAs and unique user Auditing, Authorization and Authentication needs bridged together via a custom RBAC layer, one that is horizontally scalable and stateless is quite a big deal.
Protocol translation is equally massive, as I move towards looking at ways to fork MCollective, given the lack of cooperation from Puppet Inc, this gives me a very solid way forward to not throw away peoples investment in older MCollective while wishing to find a way to move forward.
Availability
This will be released in version 0.0.25 of the Choria module which should be sometime this week. I’ve published pre-release docs already. Expect it to be deployable with very little effort via Puppet, given a good DNS setup it needs almost no configuration at all.
I’ll make a follow up post that explores the network protocol that made this possible to build with zero stored state in the Federation Broker Instances – a major achievement in my book.