by R.I. Pienaar | Jun 16, 2008 | Code
Previously I blogged a custom fact that reads /etc/facts.txt to build up some custom facts for use in Puppet manifests, well I’ve since learned a thing or two about Ruby and have improved the code, new code below:
if File.exists?(“/etc/facts.txt”)
File.open(“/etc/facts.txt”).each do |line|
var = nil
value = nil
var = $1 and val = $2 if line =~ /^(.+)=(.+)$/
if var != nil && val != nil
Facter.add(var) do
setcode { val }
end
end
end
end
As I mentioned previously I knew the code was horrible and had a whole redundant loop in it but couldn’t get it going otherwise. The big change is in choice of variable names to use inside the setcode, sees value must be a reserved word or something, so now the code is much cleaner.
by R.I. Pienaar | May 4, 2008 | Code
This is the 3rd part of my ongoing series of posts about designing a
simple Single Signon System for PHP, you should read part 1 and 2 first.
Today we look a bit more about the general information flow between browser, target web site and the SSO Server. We will use the term Secure Site for the target site, lets say a corporate intranet.
The following diagram shows the flow of information, the information flows via the browser using redirects etc.
First a few words on the requierd bits of information before this exchange can happen.
- The
Secure Site has a pre-shared key (PSK) that the SSO Server assigns,
this key gets hardcoded in the Secure Site and kept private, it never
gets passed between the parties during normal authentication requests.
- The Secure Site has a siteid
that is simply a number that uniquely identifies it to the SSO Server.
This too gets assigned by the SSO Server and does not change for the
life time of the site.
- Encryption gets done using a simple symmetrical algorithm, the PSK is the passphrase.
- The
SSO server knows what domain name a site is in, the SSO Server will use
this to validate auth requests and generate redirects based on this
domain name only.
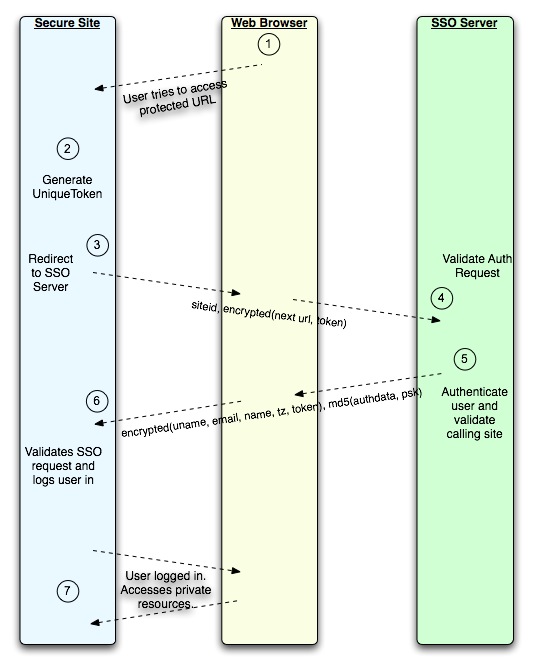
Now on to the actual information flow, this demonstrates the flow for a first time visit of an unauthenticated user, future visits will be exactly like any cookie based auth system where the user will not interact with the SSO server at all:
- The user tries to access the Secure Site
- Secure Site generate a unique single use token, and saves it in a Session
- The Secure Site redirect the browser to the SSO server with a request that has the siteid unencrypted and a encrypted string containing the URL the browser should go to if he is authenticated correctly by the SSO Server and also the Token generated in step 2.
- The SSO Server validates the request, checking Next URL against that stored for siteid after using the PSK stored for siteid to decrypt the packet.
- The user is presented with a login form. The login form shows detail about the Secure Site such as its URL, a description of the site and who to contact with any support requests about this site. The user is warned that his personal details will be shared with the site. The user logs in with a username and password and gets redirected to the Secure Site.
- The Secure Site gets a authentication packet in the redirect that has – encrypted using the PSK – the username, email address, real name, time zone and the previously generated token. In unencrypted form is a md5 hash of all the private information concatenated with the PSK, this is signature for the request and could be used as a cryptographic digital signature if the SSO Server is configured to not encrypt the private data. The Token gets removed from the session and the user gets marked as Logged In using a cookie or existing session.
- At this point the user is logged in and can access the Secure Site, the Secure Site knows his private details and can associate his data with him. From this point on it’s a standard cookie based auth and the Secure Site can decide how long the login session is valid for etc.
I think we’ll keep it at that for today, in the next part I’ll explain some of the choices made in designing this protocol and what security exploits it tries to prevent (replay attacks), what it is vulnerable too (man in the middle attacks) and how to mitigate those risks.
by R.I. Pienaar | Apr 17, 2008 | Code
This is the 2nd part of my ongoing series of posts about designing a simple Single Signon System for PHP, you should read part 1 first.
I am often annoyed about series of blog posts that don’t make it clear what the end goal is early on, so you end up wasting time reading through loads of stuff only to realise at the end its a bad fit. So below you’ll see some sample bits of code using my Single Sign On system in PHP and Apache after this you can easily decide to just ignore the rest of the posts or to keep paying attention.
First as I said the authentication should be pluggable, I want to be able to fetch users from LDAP, MySQL, and any number of other things, towards this goal I made the actual code that does the hard work pluggable by using a simple OO module and an interface. Below is a bit of code to just always allow a user ‘john’ in with the password ‘secret’, the values for name etc is hardcoded and you can’t change the settings, but you’ll get the basic idea!
<?
class StupidAuth implements pSSO_Authenticator {
    public function _authenticate($username, $password) {
        if ($username == "john" && $password == "secret") {
            return(1);
        }
return(0);
}
public function _getEmailAddress() {
return("john@doe.net");
}
public function _getRealName() {
return("John Doe");
}
public function _getUsername() {
return("john");
}
public function _getTimeZone() {
return("Europe/London");
}
public function _setEmailAddress() {
}
public function _setRealName() {
}
public function _setUsername() {
}
public function _setTimeZone() {
}
}
?>
It doesn’t really come simpler than that, within this framework you really should be able to do almost any form of authentication, if PHP can talk to it and auth then so should the SSO system. This code will live in the server, I won’t go much into the server here, it’s just a really a system to wrap the code above into a well defined protocol between client and server, more on this some other day. For now just assume there is a config file on the server and you tell it what Class implements the actual auth – StupidAuth in this case.
Now for a quick client, remember the client can run anywhere on any domain, and I want my clients to be registered with me before they can use the SSO system. To this end each client has a Pre Shared Key (PSK) and a unique ID. The PSK is used to encrypt the communications from the SSO server to the SSO client as the reply will have real names, email addresses and such in it, you don’t want this to show up in proxy logs and such!
Here’s a quick client:
<?
    require("pSSO_Client.class.php");
$psk = "goG4mUrJeacE7VyidEfd";
$siteid = 1;
$ssoServer = "http://sso.yourcompany.com/";
$thisURL = "http://" . $_SERVER["HTTP_HOST"] . $_SERVER['SCRIPT_NAME'];
session_start();
// the SSO server sent us back a token, validate it and set cookies
if (isSet($_GET['authdata']) && ($_GET['v'])) {
$psso = new pSSO_Client($_GET['authdata'], $_GET['v'], $psk,
$siteid, $ssoServer);
if ($psso->authenticate()) {
// The user is logged in, send him back to this same url
// except without any GET params etc, so he'll be a normal
// returning logged in user.
header("Location: " .$thisURL);
exit;
        } else {
            // login failed, eventhough it shouldn't have, bail out
            Throw new Exception ("Login failed:" . $psso->getError());
        }
    } else {
        // We didn't get a token, either its a guest or he already has cookies
        // from a previous visit
        $psso = new pSSO_Client("", "", $psk, $siteid, $ssoServer);
        if ($psso->isLoggedIn()) {
            print("You are logged in:<br><br>");
            print("Your

username is: " . $psso->getUserName() . "<br>");
            print("Your real name is: " . $psso->getRealName() . "<br>");
            print("Your email address is: " . $psso->getEmailAddress() . "<br>");
            print("Your timezone is: " . $psso->getTimeZone() . "<br>");
            exit;
        } else {
            print("Welcome guest, you can login <a href='" . $psso->getAuthURL($thisURL)
                . "'>here</a>");
            exit;
        }
    }
?>
A quick run through the code:
- Define the PSK, SSO Server URL and your unique ID, all of this will be supplied by the SSO server when you register your site.
- Start a session – this is used to associate a one-time-use token that travels between the SSO client and Server, more on this later but it helps prevent session replay attacks.
- Check if we got the data that the SSO server will typically pass us $_GET[‘authdata’] and $_GET[‘v’], if we did get it, start up a SSO client and authenticate. Showing the protected page on success or an error message if it failed.
- If the GET parameters aren’t present it is either a first visit or a returning visit, the SSO Client lib gets used to find out if its a returning visit and shows some personal information if the user is logged in, else presents the user with a bit of guest info and a link to the login form. Again here the SSO client library generate all the needed URLs and encryption and what not.
I think this very simple use case should demonstrate the ease of use, you could now easily decide to either just not have a local user database at all, just perhaps ACL’s based on username or some local cached user data that has additional information your app provides in a local database perhaps referenced by username, so relying simply on the SSO for auth.
You’ll remember I also wanted to do HTTP Authentication, I have a beta stage Apache mod_perl module to do this, below you’ll see a bit of Apache config to protect my Nagios installation using the SSO:
<Directory “/usr/share/nagios”>
AuthType Apache::Auth_pSSO
AuthName pSSO
PerlAuthenHandler Apache::Auth_pSSO->authenticate
require valid-user
PerlSetVar pSSO_PSK “goG4mUrJeacE7VyidEfd”
</Directory>
Again notice the PSK in there, at the moment site id and SSO server URLs are hardcoded, but like I said, its beta code 🙂
With both of the samples above, instead of a pop-up HTTP Auth dialog, you will simply see the SSO login form if you’ve not authenticated already, else you will just see the protected resource or nagios no questions asked.
So that’s it, a quick run through what can be achieved with the SSO libraries on both server and client, in the next post I’ll get into some details of the protocol between server and client.
by R.I. Pienaar | Apr 17, 2008 | Code
UPDATED: The code below is a bit crap – first ever ruby code – try this instead
As this is the first time I am posting about Puppet, maybe a few words about it first. Puppet is a configuration management system that helps you manage large infrastructures. There are ofcourse many similar things, cfengine and lcfg to name just two. I like Puppet as it has a big and active community but it is also a modern approach to the problem being that it has some properties of Object Orientation and so forth.
I’ve used cfengine – actually chose it over Puppet when it was still young – but that is over a year ago now and I if you have many or even 2 of the same nodes to maintain I urge you to check out Puppet.
So the rest is only really useful if you already know Puppet, sorry if this will bore many people 🙂
On a site I worked we used to have a file on each machine that defines a few Facter facts, this was very handy and I wanted to do something similar because I define variables like $country=”uk” and so forth in my nodes which then helps my manifests builds correct ntp configs for example. Now doing it with a global variable in the node is ok and all, but not nearly as sexy as letting each node know where they are in via facts.
In the old days hacking in new facts was a right pain and you possibly even needed to maintain your own package of facter, not so anymore, it’s in fact really nice now.
Puppet now lets you drop bits of ruby code into a directory and then sends the code off to clients on demand for integration into Facter, I won’t go into setting it up the Puppet Wiki goes into it at length. Instead I’ll show a simple bit of code to read in /etc/facts.txt on a node and present the values in it as facts.
var = nil
value = nil
facts = {}
if File.exists?(“/etc/facts.txt”)
File.open(“/etc/facts.txt”).each do |line|
var = $1 and value = $2 if line =~ /^(.+)=(.+)$/
if var != nil && value != nil
facts[var] = value
var = nil
value = nil
end
end
facts.each{|var,val|
Facter.add(var) do
setcode do
val
end
end
}
end
This code essentially just reads stuff out of key=val pairs in /etc/facts.txt and adds them to facter. Drop that into your facts directory on the master in a file ending in .rb and that should be it, with facts files on your nodes the values will now be available for use in your manifests.
Maybe not the best Ruby code as it’s my first ever Ruby code and mostly based on a sample I found in the Puppet book, I would have liked to do the Facter.add() call right in the loop that parses the file instead of using a array, but I couldn’t get that going.
Anyway, now I just distribute /etc/facts.txt to all my machines, and they know where they are and I have a simple no-hassle method for teaching machines about new things.
by R.I. Pienaar | Apr 13, 2008 | Usefull Things
Back in 2004 I posted about The Regex Coach, its a great app that I still use today, however it only really works on Windows so I have been looking for some alternatives.
There is a really great resources called Regular-Expressions.info it even has a cheap tool that you can use to do something similar to The Regex Coach. Today Lifehacker mentioned RegExr, its a great web app but also has standalone versions for Windows, Linux and OS X, full of sample regular expressions, good explanations of what a regular expression parses as etc, it is a perfect replacement for The Regex Coach, worth checking it out!
