by R.I. Pienaar | Nov 25, 2007 | Usefull Things
I played with heartbeat a year or so ago and while it was ok, I was not convinced it was 100% there yet, it lacked monitoring capabilities of resources it managed which was a major drawback in my mind.
I again had a need for a cluster recently so had another look. Since the previous time they’ve released Heartbeat version 2 which has a full resource manager like you’ll find in more mature systems.
The only time I’ve previously used a cluster system extensively was on Windows 2003 Enterprise with MS SQL Server Enterprise, the setup then was a active-passive SQL cluster with shared fibre storage. The windows cluster services works quite well, have a solid GUI and supports many nodes in a cluster.

I wouldn’t yet compare Heartbeat to commercial offerings, technically the Cluster Resource Manager introduced in version 2 is a massive step forward but configuration can be a real nightmare.
The documentation is very thin on the ground and configuration has to be done through XML files. There is a disturbing trend these days for people to think XML is an acceptable form of configuration from a human point of view but it really is not. Worse is the DTD for the XML format is the definitive source for configuration reference, as their WIKI states:
It was out of date and didn’t take into account the fact that not everyone is on the same version. Instead, you should refer to crm.dtd on your system (which is always appropriate to your version).
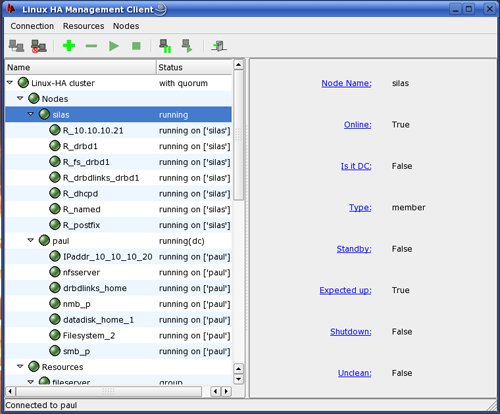
Heartbeat does provide a GUI but I found it immature, inconsistent and often had error messages pop up with no contents in them other than an ‘OK’ button. It also lacked some features, while evaluating it I decided if I had to rely on the GUI in any way as it stands today I would not use Heartbeat for my cluster as it would invalidate any high availability hopes I had. It is useful though to monitor and visualise your cluster, especially if you have a lot of groups.
Once I figured out the correct XML formats to do what I wanted and learned the command line tools and provided my own documentation for these I eventually got a full 2 node cluster going managing currently 5 resources with more to follow.
My main goal with this project was to manage HAProxy on the cluster not because HAProxy is in any way unstable but because I find it difficult to do maintenance with just one machine for it and as I adopt HAProxy more the hardware would be an unacceptable single point of failure.
Heartbeat lets you manage resources using several type of scripts, the best one to use would be the new OCF standard scripts which is designed specifically for managing cluster resources but it’s an emerging format so not a lot of scripts exist for it today. Heartbeat also support using standard /etc/init.d/ style rc scripts with the caveat that they have to be 100% LSB compliant. You’d think at least the scripts that Red Hat provide are LSB compliant but you’d be wrong, I had to fiddle with almost each one I wanted to use which is not optimal because I hate editing non-config files delivered with RPM and I think its very poor of RedHat who has been making a point of telling anyone who would listen that they’re completely LSB compliant.
I would also have liked to build a HA NFS server but unfortunately Heartbeat version 2 and DRBD version 8 does not yet play nicely, so that is a project for some other time.
My conclusions on Heartbeat then is that it is a good solid project especially with version 2, I think in a year or so once documentation etc had a chance to mature it would be a good choice for almost anyone, for now though it is unfortunately out of reach for the average guys.
by R.I. Pienaar | Nov 1, 2007 | Usefull Things
Recently Google announced that all gmail users are getting IMAP, this is fantastic news. I won’t actually use it with an IMAP client but I will use it to backup my mail and my meta data! It might even help me to slowly import years and years of old mail into GMail.
So how to do a backup, first you need imapsync or something similar, I’ll use imapsync since that’s what I know.
Second you need a local imap server to dump your gmail account into, I am using my current server that already has other mail in it so I made a sub-folder called GMail to sync into.
Once you have imapsync installed its pretty simple with the following command line:
imapsync --host1 imap.gmail.com --ssl1 --user1 you@gmail.com \
--password1 secret --host2 your.imap.com --user2 you --password2 secret \
--prefix2 INBOX.GMail. --authuser1 you@gmail.com --authmech1 LOGIN \
--authmech2 LOGIN --syncinternaldates
You’ll need to look at that command and set appropriate options for your user, password and imap account. Also if you’re going to run this on a shared machine where other user accounts exist, you should use the –passfile1 and –passfile2 options to not show your password in the output of ps.
The process is slow, and creates some duplicates for instance you’ll have a [Gmail]/All Mail folder that contains all your mail but you’ll also have folders for each tag that would have copies of messages that are already in your All Mail. This to me is a small price to pay for the peace of mind that solid off-site backups provide as the thought of my mail on a 3rd party system has been keeping me awake 🙂
by R.I. Pienaar | Jun 23, 2007 | Usefull Things
I’ve had the miss-fortune of configuring IPSEC on many FreeBSD machines and other devices in the past and in all cases it’s been a pain, as a result I’ve been putting off securing connections between 3 machines that I knew needed IPSEC.
Last night I figured I may as well start looking at what is involved in building a star topology between the three hosts where comms between each node and each other node is encrypted. Turns out it could not possibly have been simpler.
This is well documented in the RedHat docs – RHEL 3, RHEL 4, RHEL 5 – but it’s worth repeating because it really is clean and simple and elegant.
Being that these are point-to-point tunnels it makes a lot of sense to see the connections as new network cards and this is the approach redhat took, simply create /etc/sysconfig/network-scripts/ifcfg-ipsecX files where X is any number. This is a sample:
DST=x.x.x.x
TYPE=IPSEC
ONBOOT=yes
IKE_METHOD=PSK |
DST=x.x.x.x
TYPE=IPSEC
ONBOOT=yes
IKE_METHOD=PSK
And do the same on your other host. Now create a pre-shared key in /etc/sysconfig/network-scripts/keys-ipsecX with file mode 600:
This key has to be the same on both hosts, run ifup ipsecX and it should negotiate, check /var/log/messages for diagnostics.
It is that easy, you can use tcpdump to verify that all is working good.
Under the covers the redhat scripts still use racoon and all the standard stuff, it creates files in /etc/racoon and you can use tools such as setkey etc to diagnose problems.
This is a simple p2p VPN, the RedHat docs shows how to do it on your gateway device – it’s as simple.
by R.I. Pienaar | Feb 12, 2007 | Usefull Things
Nxsy mentioned that he is using Google Bookmarks and GMarks to access it from Firefox and I thought I’d give it a try since I’m really not liking del.icio.us at all anymore.
The problem with del.icio.us isn’t just that the name is untypable and unpronouncable it’s lack of good integration with Firefox just spoils it completely. Yeah they have an extension of their own and there are some others that compliment it, but really it’s a pain. I ended up not using my bookmarks because I couldn’t be bothered with the UI.
So I exported my del.icio.us and imported it into Google Bookmarks, re-tagged everything and now using GMarks I think I’ve used my bookmarks more in the last 2 days than in the previous 3 months combined. I love the home-home quicksearch box,the sidebar is marginally useful – mostly for editing/managing the bookmarks, the drop down list of bookmarks I am not fond of, but the quicksearch and convenient in-browser-ui for managing bookmarks makes this a winner.
by R.I. Pienaar | Feb 7, 2007 | Usefull Things
I’m running a combination XP and OS X machines at home linked together using Synergy. I’ve been contemplating moving away from XP so thought I’ll give Ubuntu another go.
My drives are pretty full except my OS Boot drive, lots of space there so I thought I’ll resize it and put Ubuntu at the end in a small partition while I test things out. It sounded like a good idea at the time but it turned out to be pretty disastrous.
I used the GParted LiveCD to do the resizing after first running a defrag on the drive. On the surface everything went fine but the XP wouldn’t boot.
I admit not reading up enough about the process but it turns out after doing the resize with GParted you’ll need to force chkdsk the boot disk, the only way to do this involves using the XP Setup CD and it’s recovery console.
My machine has a SATA drive that isn’t directly supported by the XP Setup disk so I need to use a Floppy driver disk, I don’t even have a floppy drive anymore so I was pretty much stuck.
I installed Ubuntu 6.10 in the free space, it worked a charm and I soon had at least something back up to get going but still needed to chkdsk the XP partition. I knew the files were there – Ubuntu mounted it on the Desktop – so it was all good, except something small somewhere causing grief.
I was faced with either buying a Floppy drive and Floppy cables, and finding blank floppies somewhere or finding another solution. Solution came in the form of VMWare Server.
VMWare supports mounting RAW partitions into a VM, so in theory I should be able to create a virtual instance that boots my XP Partition, I tried this and ended up with a Blue Screen and immediate reboot. The problem being that my SATA drive shows up as a SCSI drive in XP under VMWare and my XP did not have the right drivers to load the drive and boot from it, so still I needed to chkdsk the drive.
I took my XP CD, downloaded the VMWare Server drivers and mounted that as a floppy into the VM, booted from the CD and loaded the drivers into the CD, ran the recovery console and got a C:\ prompt. Here I was able to chkdsk the stricken partition and eventually boot right into XP, problem solved.
I took this one step further by creating a new hardware profile in my XP box once it was running, loaded in the VMWare SCSI drivers and now I can boot my XP into fully working state under Ubuntu using VMWare.
So, the short of it, yes you can resize your XP Pro Boot disks, even NTFS ones using Open Source tools, but you need to be 100% sure you can get your recovery console up and running to run chkdsk afterwards, my machine is now happy again and booting Ubuntu and XP.
VMware Kicks Arse.
by R.I. Pienaar | Jan 22, 2007 | Usefull Things
I’ve a number of machines that needs memory upgrades, I didn’t want to turn them off to see what is inside in order to plan this. Under windows it’s pretty easy, just download and run CPU-Z and you’ll know all there is to know.
I did a lot of searching etc and eventually came across dmidecode, you just run it as root and it parses through /dev/mem and loads the DMI tables, parses them and prints them in human readable form.
It shows a lot of useful information, on my IBM HS20 Blade it shows model, serial, hardware numbers etc. Here is a sample of the memory section:
Handle 0x0017
DMI type 16, 15 bytes.
Physical Memory Array
Location: Proprietary Add-on Card
Use: System Memory
Error Correction Type: Multi-bit ECC
Maximum Capacity: 16 GB
Error Information Handle: Not Provided
Number Of Devices: 4
Handle 0x0018
DMI type 17, 21 bytes.
Memory Device
Array Handle: 0x0017
Error Information Handle: Not Provided
Total Width: 72 bits
Data Width: 64 bits
Size: 512 MB
Form Factor: DIMM
Set: 1
Locator: DIMM1
Bank Locator: Slot 1
Type: DDR
Type Detail: Synchronous
Handle 0x0019
DMI type 17, 21 bytes.
Memory Device
Array Handle: 0x0017
Error Information Handle: Not Provided
Total Width: 72 bits
Data Width: 64 bits
Size: 512 MB
Form Factor: DIMM
Set: 1
Locator: DIMM2
Bank Locator: Slot 2
Type: DDR
Type Detail: Synchronous
Handle 0x001A
DMI type 17, 21 bytes.
Memory Device
Array Handle: 0x0017
Error Information Handle: Not Provided
Total Width: 72 bits
Data Width: 64 bits
Size: 512 MB
Form Factor: DIMM
Set: 2
Locator: DIMM3
Bank Locator: Slot 3
Type: DDR
Type Detail: Synchronous
Handle 0x001B
DMI type 17, 21 bytes.
Memory Device
Array Handle: 0x0017
Error Information Handle: Not Provided
Total Width: 72 bits
Data Width: 64 bits
Size: 512 MB
Form Factor: DIMM
Set: 2
Locator: DIMM4
Bank Locator: Slot 4
Type: DDR
Type Detail: Synchronous |
Handle 0x0017
DMI type 16, 15 bytes.
Physical Memory Array
Location: Proprietary Add-on Card
Use: System Memory
Error Correction Type: Multi-bit ECC
Maximum Capacity: 16 GB
Error Information Handle: Not Provided
Number Of Devices: 4
Handle 0x0018
DMI type 17, 21 bytes.
Memory Device
Array Handle: 0x0017
Error Information Handle: Not Provided
Total Width: 72 bits
Data Width: 64 bits
Size: 512 MB
Form Factor: DIMM
Set: 1
Locator: DIMM1
Bank Locator: Slot 1
Type: DDR
Type Detail: Synchronous
Handle 0x0019
DMI type 17, 21 bytes.
Memory Device
Array Handle: 0x0017
Error Information Handle: Not Provided
Total Width: 72 bits
Data Width: 64 bits
Size: 512 MB
Form Factor: DIMM
Set: 1
Locator: DIMM2
Bank Locator: Slot 2
Type: DDR
Type Detail: Synchronous
Handle 0x001A
DMI type 17, 21 bytes.
Memory Device
Array Handle: 0x0017
Error Information Handle: Not Provided
Total Width: 72 bits
Data Width: 64 bits
Size: 512 MB
Form Factor: DIMM
Set: 2
Locator: DIMM3
Bank Locator: Slot 3
Type: DDR
Type Detail: Synchronous
Handle 0x001B
DMI type 17, 21 bytes.
Memory Device
Array Handle: 0x0017
Error Information Handle: Not Provided
Total Width: 72 bits
Data Width: 64 bits
Size: 512 MB
Form Factor: DIMM
Set: 2
Locator: DIMM4
Bank Locator: Slot 4
Type: DDR
Type Detail: Synchronous
So I have 4 total memory slots, each slot has a 512MB DDR module in it, this means I’ll be throwing it all away and buying new RAM.
