The Choria Server is the agent component of the Choria Orchestrator system, it runs on every node and maintains a connection to the middleware.
Traditionally we’ve configured it using Puppet along with its mcollective compatibility layer. We intend to keep this model for the foreseeable future. Choria Server though has many more uses – it’s embeddable so can be used in IoT, tools like our go-backplane, side cars in kubernetes in more. In these and other cases the Puppet model do not work:
- You do not have CM at all
- You do not own the machines where Choria runs on, you provide a orchestration service to other teams
- You are embedding the Choria Server in your own code, perhaps in a IoT device where Puppet does not make sense
- Your scale makes using Puppet not an option
- You wish to have very dynamic decision making about node placement
- You wish to integrate Choria into your own Certificate Authority system
In all these cases there are real complex problems to solve in configuring Choria Server. We’ve built a system that can help solve this problem, it’s called the Choria Server Provisioner and this post introduce it.
Server side design
The Provisioner is inspired by old school bootstrap PXE networks – unconfigured nodes would join a VLAN where they will do network boot and get their configuration, once configured they reboot into the right VLAN where they will be production servers.
As in that model Choria has a mode called Provisioning Mode where it will use compiled in defaults for it’s bootstrap configuration – essentially to find its equivalent of a PXE VLAN – and then it will allow programatic configuration.
% choria buildinfo Choria build settings: Build Data: Version: 0.5.1 Git SHA: 7d0a215 Build Date: 2018-08-10 10:26:42 +0000 License: Apache-2.0 Go Version: go1.10.2 Network Broker Settings: Maximum Network Clients: 50000 Embedded NATS Server Version: 1.2.0 Server Settings: Provisioning Brokers: prov.example.net:4222 Provisioning Default: true Default Provisioning Agent: true Provisioning TLS: false Provisioning Registration Data: /etc/choria/metadata.json Provisioning Facts: /etc/choria/metadata.json Provisioning Token: set Agent Providers: Golang MCollective Agent Compatibility version 0.0.0 Security Defaults: TLS: true x509 Security: true |
Here under Server Settings you can see the compiled in defaults. When this server starts up without a configuration that specifically prevent provisioning mode it will connect to prov.example.net:4222 without TLS, in that mode it will only connect to the provisioning sub collective and it will publish periodically its /etc/choria/metadata.json to the topic choria.provisioning_data.
In the next release of Choria the method for discovering the provisioning broker is pluggable, so you can supply any logic you wish rather than use this single compile time flag.
It will have an agent choria_provision running that expose actions to request a CSR, configure it, restart it and more.
It will then wait until some process starts interacting with it and eventually give it a configuration file and ask it to restart. Once restarted it will join it’s real home and continue there as a normal server. This is where the Choria Server Provisioner come in.
Choria Server Provisioner
As you saw above the Choria Server will connect to a specific broker and sit in a provisioning sub collective waiting to be managed. We wrote a generic high performance manager that lets you plug your logic into it and it will configure your nodes. In our tests with a very fast helper script this process is capable of provisioning many thousands of machines a minute – many more than any cloud will allow you to boot.
The basic flow that the provisioner has is this:
On startup it will:
- start to listen for events on the topic choria.provisioning_data
- do a discover on the provisioning sub collective and keep doing it on regular intervals
Any nodes identified using any of these 2 methods are added to the work queue where one of the configured number of workers will start provisioning them, this per worker flow is:
- Fetch the inventory using rpcutil#inventory
- Request a CSR if the PKI feature is enabled using choria_provision#gencsr
- Call the helper with the inventory and CSR, expecting to be configured
- If the helper sets defer to true the node provisioning is ended and next cycle will handle it
- Helper returns a configuration, signed certificate and CA chain in JSON format
- Configure the node using choria_provision#configure
- Restart the node using choria_provision#restart
You can see here this is a generic flow and all the magic is left up to a helper, so lets look at the helper in detail.
The helper is simply a script or program written in any configuration language that receives node specific JSON on STDIN and returns JSON on its STDOUT.
The input JSON looks something like this:
{
  "identity": "node1.example.net",
  "csr": {
    "csr": "-----BEGIN CERTIFICATE REQUEST-----....-----END CERTIFICATE REQUEST-----",
    "ssldir": "/path/to/ssldir"
  },
  "inventory": "{\"agents\":[\"choria_provision\",\"choria_util\",\"discovery\",\"rpcutil\"],\"facts\":{},\"classes\":[],\"version\":\"0.5.1\",\"data_plugins\":[],\"main_collective\":\"provisioning\",\"collectives\":[\"provisioning\"]}"
} |
In this example the PKI feature is enabled and the CSR seen here was created by the node in question – and it kept its private key secure there never transferring it anywhere. The inventory is what you would get if you ran mco rpc rpcutil inventory -I node1.example.net, here the main thing you’d look at is the facts which would be all the metadata found in /etc/choria/metadata.json.
The helper then is any program that outputs JSON resembling this:
{
  "defer": false,
  "msg": "Reason why the provisioning is being defered",
  "certificate": "-----BEGIN CERTIFICATE-----......-----END CERTIFICATE-----",
  "ca": "-----BEGIN CERTIFICATE-----......-----END CERTIFICATE-----",
  "configuration": {
    "plugin.choria.server.provision": "false",
    "identity": "node1.example.net"
  }
} |
Here’s a bit of code showing CFSSL integration and country specific configuration:
request = JSON.parse(STDIN.read) request["inventory"] = JSON.parse(request["inventory"]) reply = { "defer" => false, "msg" => "", "certificate" => "", "ca" => "", "configuration" => {} } identity = request["identity"] if request["csr"] && request["csr"]["csr"] ssldir = request["csr"]["ssldir"] # save the CSR File.open("%s.csr" % identity, "w") do |f| f.puts request["csr"]["csr"] end # sign the CSR using CFSSL signed = %x[cfssl sign -ca ca.pem -ca-key ca-key.pem -loglevel 5 #{identity}.csr 2>&1] signed = JSON.parse(signed) abort("No signed certificate received from cfssl") unless signed["cert"] # Store the CA and the signed cert in the reply reply["ca"] = File.read("ca.pem") reply["certificate"] = signed["cert"] # Create security configuration customised to the SSL directory the server chose reply["configuration"].merge!( "plugin.security.provider" => "file", "plugin.security.file.certificate" => File.join(ssldir, "certificate.pem"), "plugin.security.file.key" => File.join(ssldir, "private.pem"), "plugin.security.file.ca" => File.join(ssldir, "ca.pem"), "plugin.security.file.cache" => File.join(ssldir, "cache") ) end |
With that out of the way lets create the rest of our configuration, we’re going to look at per country specific brokers here:
case request["inventory"]["facts"]["country"] when "mt" broker = "choria1.mt.example.net:4223" when "us" broker = "choria1.us.example.net:4223" else broker = "choria1.global.example.net:4223" end reply["configuration"].merge!( "identity" => identity, "plugin.choria.middleware_hosts" => broker, "classesfile" => "/opt/puppetlabs/puppet/cache/state/classes.txt", "collectives" => "mcollective", "loglevel" => "warn", "plugin.yaml" => "/tmp/mcollective/generated-facts.yaml", "plugin.choria.server.provision" => "false", ) puts reply.to_json |
The configuration is simply Choria configuration as key value pairs – all strings. With the provisioning mode on by default you must disable it specifically so be sure to set plugin.choria.server.provision=false.
You can see you can potentially integrate into any CA you wish and employ any logic or data source for making the configuration. In this case we used the CFSSL CLI but you’d in reality use its API and I integrate with our asset databases to ensure a node goes with the rest of it’s POD – we have multiple networks per DC and this helps our orchestrators perform better. You could perhaps consider using Jerakia for a more suitable store for this than the case statement above.
The provisioner will expose it’s statistics using Prometheus format and it embeds our Choria Backplane so you can perform actions like Circuit Breaking etc fleet wide.
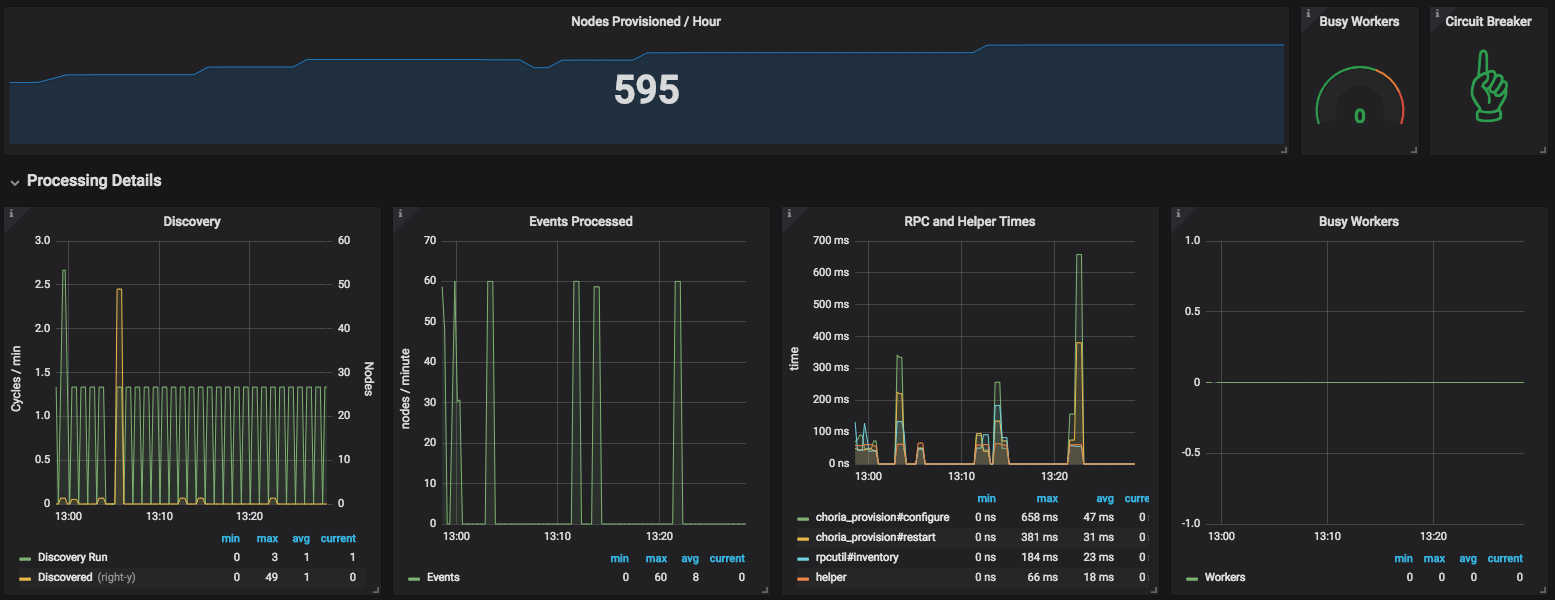
This dashboard is available in the GitHub repository.
Demonstration
I made a video explainer that goes in more detail and show the system in action:
Conclusion
This is a quick introduction to the process, there’s a lot more to know – you can write your own custom provisioner and even your own custom agent and more – the provisioning-agent GitHub repository has all the details. The provisioner detailed above is released as RPMs on our package cloud repo.
It’s a bit early days for this tool – personally I will soon roll it out to 10s of data centres where it will manages 100s of thousands of nodes, expect a few more hardening changes to be made. In the future we’ll also support Choria version upgrades as part of this cycle.
